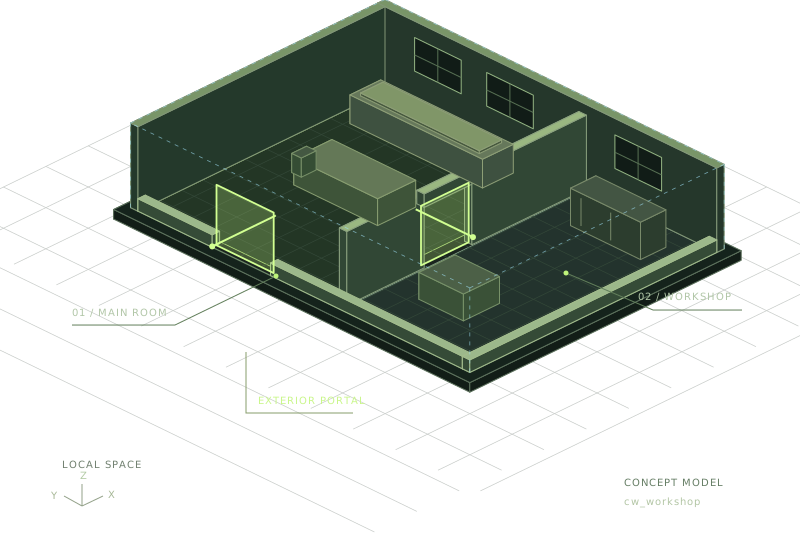
A working FiveM MLO is more than an interior-shaped model. You need geometry, appropriate collision, an MLO archetype with room and portal data, a world placement, and a resource that delivers the exported assets.
This walkthrough uses an original two-room workshop as a controlled exercise. It is not a downloadable, prebuilt game asset. You will create the geometry yourself. The example names below belong to the exercise; they are not special CodeWalker filenames or guaranteed settings for every interior.
What you will build
Keep the first version deliberately small: a front room, a back workshop, one doorway between them, and one exterior entrance. Leave moving doors, elaborate lighting, entity sets and complex exterior replacements for a later revision.
The illustrated model on this page shows the relationship between spaces. It is a conceptual diagram, not evidence of an in-game test. Your acceptance test is whether the actual exported interior behaves correctly on your target server.
Before starting, complete the Blender–Sollumz round trip and first YMAP exercise. You need basic Blender modeling skills; CodeWalker is not a replacement for a modeling application.
1. Define the site and the build target
Choose a development location where you can identify nearby vanilla geometry and existing map resources. Record the world position and orientation you want. For the first exercise, avoid a complicated vanilla-building replacement: an existing collision shell can block your new entrance even when your own model has a doorway.
Decide whether you are producing Legacy or Enhanced assets. Maintain separate export folders when working with both. The Cfx.re Enhanced onboarding guide points to the applicable conversion tooling and behavioral differences. Do not assume the dev46 download linked on this site is the right toolchain for both targets.
Write a small brief: two rooms, one external entrance, no scripted interactions. Draw the plan before building detail. This makes “finished” a testable condition rather than a moving target.
2. Block out the interior in Blender
Make floors, walls, a ceiling and clear doorway openings. Choose a consistent local origin and preserve a record of the intended world transform. The Sollumz modeling tutorial demonstrates keeping a placement reference while moving editable geometry to the origin.
For this exercise, use separate collections for visible geometry, collision and reference material. These collection names are your organization, not mandatory game data. Make it difficult to export a reference building by accident.
Inspect the model from inside. Check face direction, wall intersections and the relationship between the doorway and floor. A decorative frame should not reduce the usable opening more than you intended. Keep scale and transforms consistent throughout the file; do not “fix” a mismatched placement later by randomly scaling the whole interior in the map.
Save a checkpoint at the blockout stage. A plain but navigable room is a better foundation than a furnished scene with an uncertain origin.
3. Prepare drawables and materials
Use Sollumz to prepare the visible meshes as GTA drawables and assign the appropriate shader materials for your chosen workflow. Start with a small number of ordinary, opaque surfaces. Complex glass, emissive features and special effects create extra failure modes that are not needed to prove the interior structure.
Export and inspect one representative surface before texturing everything. Check that the texture references and material appearance survive the trip to CodeWalker. Reusing a small, coherent material set also makes later corrections easier to apply.
Keep a simple asset inventory. An example might include cw_workshop_shell for the visible shell and cw_workshop_col for the interior collision. Distinct names help you recognize which exported file you are inspecting.
4. Create collision as a separate task
Construct a simplified collision shell for the surfaces the player should contact. It should preserve the real floor, walls and openings without mechanically copying every decorative edge.
The Sollumz collision tutorial covers conversion to a collision composite and collision material assignment. It also explains the need for room-specific floor material setup so room IDs can be assigned. Follow the conventions of your version rather than assuming a visual room number is the exact underlying collision value.
Inspect the exterior entrance from both sides. If you are modifying an existing building, identify every collision asset that blocks that opening. Do not delete unrelated world collision just to make the door passable. For this first original exercise, keeping the site free of overlapping replacements makes the test much clearer.
The collision lesson provides a separate walking and boundary test plan.
5. Create the YTYP and MLO archetype
The archetype definitions connect your asset names to the data the game needs. The Sollumz YTYP tutorial describes creating base archetypes for drawables and an MLO archetype from the collision selection. Follow that documented structure rather than treating the visible shell as a complete interior by itself.
For the workshop exercise, the important outcome is an MLO definition that references the intended interior assets and contains the interior organization. Keep a note of the MLO archetype’s exact name; you will place that name in a YMAP later.
Do not rename the archetype halfway through testing unless you also update every reference. A cosmetic filename cleanup can otherwise look like a rendering failure.
6. Add rooms, limbo and portals
Create the limbo room using the provided tool, then define the front room and workshop. Set room bounds from geometry that actually describes each space. Do not use one enormous bound because selecting accurate geometry takes longer.
At the doorway between the rooms, create a portal from its four corners and connect the correct rooms. At the external entrance, connect the interior to limbo using the documented direction convention. A portal is visibility data; it is not the visible door mesh and it does not create a hole in collision.
Treat this as a small graph: front room ↔ workshop, and front room ↔ outside. Check the endpoint assignments and orientation in the editor. Then test the same transitions in the game. Do not rely on whichever viewport angle happens to make the interior look correct.
Keep internal entities associated with the appropriate interior structure. Avoid reproducing an entire interior as unrelated world placements just because that initially makes it visible. The rooms and portals lesson expands the two-room test rather than offering universal flag values.
7. Export into a clean folder
Select the intended export objects and confirm that required objects are not hidden. Export using one consistent route. The documented XML workflow converts the interchange output through CodeWalker’s RPF Explorer.
Open the exported game-format assets before packaging them. Check that the expected drawables and collision exist and that the YTYP contains the intended definitions. Do not mix today’s YTYP with last week’s collision because both filenames happen to match.
Keep source, interchange and deployable files in different folders. Never turn .ydr.xml into .ydr by renaming it. Export or convert it properly.
8. Place the interior in CodeWalker
Load your exported assets into the project. Add a new YMAP and an entity that uses the MLO archetype’s exact name. Apply the recorded placement transform once. If you authored geometry in local space, do not also bake the same world translation into every component.
Inspect the entrance against the surrounding world and calculate the YMAP’s flags and extents before saving. The Sollumz placement guide documents this stage.
CodeWalker’s game map-manifest generation and FiveM’s fxmanifest.lua serve different systems. A generated _manifest.ymf is not a replacement for the resource manifest below.
9. Build the FiveM resource
This example assumes one custom YTYP named cw_workshop.ytyp. The names of your drawable and collision exports may differ; keep the names generated by your project.
cw_workshop/
  fxmanifest.lua
  stream/
    cw_workshop.ymap
    cw_workshop.ytyp
    cw_workshop_shell.ydr
    cw_workshop_col.ybn
    # Add texture dictionaries and other required exports.
Use a resource manifest with the YTYP explicitly registered:
fx_version 'cerulean'
game 'gta5'

this_is_a_map 'yes'

files {
    'stream/cw_workshop.ytyp'
}

data_file 'DLC_ITYP_REQUEST' 'stream/cw_workshop.ytyp'
The directives and data-file type are documented by Cfx.re and its data-file reference. Add the rest of your project’s actual dependencies; this snippet is not a universal manifest for every MLO.
10. Test behavior, not just appearance
Start the resource on a development server and visit the recorded location. Walk from the street through the front room and into the workshop, then reverse the route. Look through each doorway before crossing it. Turn around while standing at the threshold and test from both sides of each room boundary.
Check solid floors, usable openings and unwanted barriers. Repeat under different lighting conditions, reconnect, and approach from a distance. Finally, test with the other map resources that will coexist at that location.
Save observations with coordinates, camera direction and the exact build you used. Change one thing at a time when a test fails. A room that disappears from one angle requires different investigation from a player falling through a floor.
The next stages are optimization and a repeatable release checklist. Do not call the MLO finished because one CodeWalker screenshot looks right.